Infrastructure as Code: Setting up a web application penetration testing laboratory
Hello World! Having a laboratory is necessary to sharpen your skills and deep dive into new vulnerabilities as a pentester. Today we are going to build a beginner-friendly lab in the Amazon cloud using Terraform. But first what is Infrastructure as Code and Terraform?
Infrastructure as Code is a principle which intends to provide infrastructure by writing machine-readable configuration files - in other words code. This has quite a few advantages:
- You can quickly create and destroy your lab.
- You can give your lab as code to your colleagues and friends.
- If you have bugs in your lab setup, you just have to fix them once.
- You can use version control systems like git to track changes.
- The infrastructure is automated, reproducible, testable and self-documenting.
- You can create interfaces (files containing variables) for different deployments of your infrastructure.
We are using the AWS cloud to host all the instances. In my humble opinion AWS is a very user-friendly cloud solution and not that expensive. As an example: I’m using the AWS region Frankfurt/eu-central-1 and the instance type t2.large. If this instance is running 40 Hours straight it will cost ~ $4.29.
To set up the infrastructure as code we use Terraform and the Hashicorp configuration language.
Terraform is a tool for building, changing, and versioning infrastructure safely and efficiently.
Terraform is written in Go and open source. To put it in simple words Terraform is managing the state of your deployment. This is achieved by comparing the real-world state of your infrastructure with the state described in Terraform configurations. The automation of the deployment is possible because of Terraform Providers. There are Providers for any large cloud platform like AWS, Azure or the Google Cloud. Providers are basically a Wrapper for any API, so that Terraform can interact with it. Providers are not limited to AWS, checkout the list of providers here. Basically, Terraform is parsing the configuration files and executing the defined API calls.
Vulnerable web applications
The lab will have three different vulnerable web applications:
- Damn vulnerable web application - DVWA is an application written in PHP/MySQL and is very beginner-friendly.
- OWASP Juice shop - This project was created by OWASP and contains all the vulnerabilities from the OWASP Top 10. The Juice Shop is written in NodeJS, Express and Angular.
- Hackazon - The Hackazon stack is PHP/JS/MySQL and uses AJAX to communicate with an REST API.
All the applications are inside of Docker containers and pulled from Dockerhub.
Prerequisites
- Install Terraform. Guide
- Create AWS access and secret keys for the Terraform provider to authenticate and authorize. Documentation
- Create SSH keys to log in to your instance. Documentation
- Clone my repository to your local machine. Terraform hacking lab
Setup
These are the steps necessary to get your lab up and running. If you really want to understand what is going on behind the scenes read the part “Explanation of the code”. If you have problems with the setup feel free to reach out on Twitter @avasdream_.
-
Create a variables.tf file in the root directory of the repository and paste the following into it:
variable "aws_access_key" {
default = "D0NTPV5HCR3DST0G1THVB"
}
variable "aws_secret_key" {
default = "D0NTPV5HCR3DST0G1THVB"
}
variable "aws_region" {
default = "eu-central-1"
}
variable "ssh_key_path" {
default = "C:/Users/...."
}
variable "instance_type" {
default = "t2.large"
}
variable "ssh_key_name" {
default = "terraform-key"
}
variable "ip_whitelist" {
default = ["1.3.3.7/32"]
}
The variables file is the interface which makes our setup reusable.
-
Fill the variables with your data.
- aws_access_key - The previous from AWS supplied access key.
- aws_secret_key - The previous from AWS supplied secret key.
- aws_region - The region where you want your EC2 instances to be hosted.
- ssh_key_path - Only on Windows. The absolute path to your SSH keys. This will output a putty command which you can paste directly in your terminal to connect to the instance.
- instance_type - The type of AWS Instance you want to host your lab on. List of Instance Types
- ssh_key_name - The name of your SSH key.
- ip_whitelist - All the IPs which should have access to the laboratory. Your own WAN IP is added automatically to the list.
-
Initialize the Terraform state by executing the command
terraform init. -
Apply the configuration to AWS. Execute the command
terrafrom apply.The output should look like this:
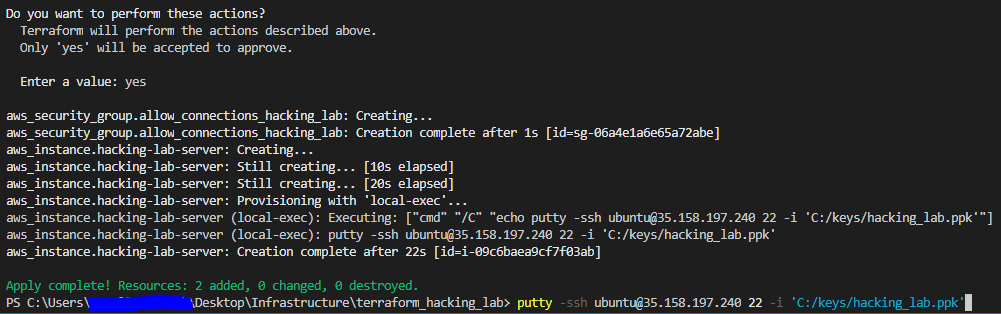
Now you should be able to visit the IP of your instance and find Hackazon on port 80, DVWA on port 81 and Juice Shop on port 82. Happy Hacking!
If you are finished with hacking, you can shut it down with the command terraform destroy. The output should look like this: 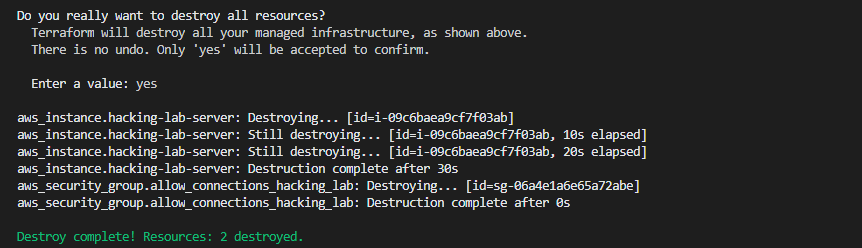
Explanation of the Code
In this section I will explain what is going on and what each file in the repository is doing. Hopefully, after this you can change parts of the code for your custom setup.
data "aws_ami" "ubuntu" {
  most_recent = true

  filter {
    name   = "name"
    values = ["ubuntu/images/hvm-ssd/ubuntu-bionic-18.04-amd64-server-*"]
  }

  filter {
    name   = "virtualization-type"
    values = ["hvm"]
  }

  owners = ["099720109477"] # Canonical
}
get_ami_image.tf is searching the Amazon machine Images (AMI) for the matching image with the name ubuntu/images/hvm-ssd/ubuntu-bionic-18.04-amd64-server-* and the matching virtualization type hvm.
data "http" "external_ip" {
  url = "http://ipv4.icanhazip.com/"
}
get_external_ip.tf is a data source. Data sources are used to fetch or compute data used in the configuration. This file is simply making an API request to http://ipv4.icanhazip.com to get your external IP. The IP is used in the security_groups.tf file to configure the access to your lab.
#!/bin/bash
apt update
apt install docker.io git -y
systemctl enable docker
docker run --rm --name hackazon -p 80:80 -d mutzel/all-in-one-hackazon:postinstall supervisord -n
docker run --rm --name dvwa -d -p 81:80 vulnerables/web-dvwa
docker run --rm --name juice-shop -p 82:3000 -d bkimminich/juice-shop
install_lab.sh is a simple Bash script. This script will be executed when the EC2 instance is created. First Docker is installed and afterwards the vulnerable web services are started in containers.
/*
  Define the AWS Instance
*/
data "template_file" "install_script" {
  /* File template for the install script */
  template = "${file("install_lab.sh")}"
}
resource "aws_instance" "hacking-lab-server" {
  ami                    = "${data.aws_ami.ubuntu.id}"
  instance_type          = "${var.instance_type}"
  vpc_security_group_ids = ["${aws_security_group.allow_connections_hacking_lab.id}"]
  /* Specify SSH Key Name for login */
  key_name = "${var.ssh_key_name}"
  /* Include Bash file and execute */
  user_data = "${data.template_file.install_script.rendered}"
  tags = {
    Name = "hacking-lab-server"
  }

  /* This local exec is just for convenience and opens the ssh sessio. */
  provisioner "local-exec" {
    command = "echo putty -ssh ubuntu@${aws_instance.hacking-lab-server.public_ip} 22 -i '${var.ssh_key_path}'"
  }
}
main.tf defines the EC2 instance and a data source for the install_lab.sh file. The template_file is reading the bash script from disk and the script is used in the user_data variable of the aws_instance resources. The ami variable retrieves the ID of the AMI which is filtered in get_ami_image.tf. The instance_type and key_name are defined in the variables.tf file. The local-exec provisioner is executing a local command. The command is just for convenience and is echoing a putty command you can paste to your shell and start the SSH connection.
provider "aws" {
  access_key = "${var.aws_access_key}"
  secret_key = "${var.aws_secret_key}"
  region     = "${var.aws_region}"
  version    = "~> 2.7"
}
provider.tf is defining all the important parameters for the AWS API.
resource "aws_security_group" "allow_connections_hacking_lab" {
  name        = "allow_connections_hacking_lab"
  description = "Allow TLS inbound traffic for ssh but only for host PCs external IP. Created with terraform for the hacking lab"


  ingress {
    from_port   = 22
    to_port     = 22
    protocol    = "tcp"
    cidr_blocks = concat(formatlist("%s/32", list(chomp(data.http.external_ip.body))), var.ip_whitelist)
  }
  /* Hackazon */
  ingress {
    from_port   = 80
    to_port     = 80
    protocol    = "tcp"
    cidr_blocks = concat(formatlist("%s/32", list(chomp(data.http.external_ip.body))), var.ip_whitelist)
  }
  /* DVWA */
  ingress {
    from_port   = 81
    to_port     = 81
    protocol    = "tcp"
    cidr_blocks = concat(formatlist("%s/32", list(chomp(data.http.external_ip.body))), var.ip_whitelist)
  }
  /* Juice Shop */
  ingress {
    from_port   = 82
    to_port     = 82
    protocol    = "tcp"
    cidr_blocks = concat(formatlist("%s/32", list(chomp(data.http.external_ip.body))), var.ip_whitelist)
  }
  tags = {
    Name = "allow_connections_hacking_lab"
  }
  egress {
    from_port   = 80
    to_port     = 80
    protocol    = "6"
    cidr_blocks = ["0.0.0.0/0"]
  }
  egress {
    from_port   = 443
    to_port     = 443
    protocol    = "6"
    cidr_blocks = ["0.0.0.0/0"]
  }
}
security_groups.tf is managing the allowed incoming and outgoing traffic to your instance. The outgoing traffic for port 80 and 443 are allowed because our instance needs internet access. For incoming traffic the ports where our vulnerable web applications are running are allowed. The default SSH port 22 is also allowed, otherwise we could not connect via SSH to our instance.
Adding more vulnerable Containers
A lab setup should be able to quickly add new vulnerabilities. With the Terraform configuration files we need to change only a few lines to add new containers. In this section we are going to add a vulnerable container for the Shellshock vulnerability.
- Add the Docker command to pull and start the vulnerable container to the
install_lab.shscript.
docker run --rm -d -p 8080:80 vulnerables/cve-2014-6271
- Add the security rule to allow incoming traffic to the new port 83.
/* Shellshock */
ingress {
  from_port   = 8080
  to_port     = 8080
  protocol    = "tcp"
  cidr_blocks = concat(formatlist("%s/32", list(chomp(data.http.external_ip.body))), var.ip_whitelist)
}
I added the Shellshock vulnerability to the repository. Here is a list of other vulnerable docker images.